Introduction
The cloud has many advantages over on-premises environments, especially the ease with which infrastructure can be created. Cloud Devops tools such as Terraform, Arm Templates and the Azure CLI can largely automate the rapid creation of application environments in the cloud. However, when an environment goes into use there are often manual steps and configuration changes required to keep the environment working for a group of applications.
Later, when we want to create another environment based on a working environment, including those parts that have been created manually, it can take a long time to identify each component required, and to work out the order in which things need to be created.
Largely for this reason, AzTfExport (Azure Terraform Export) has been created.
Repeatable State, Desired State and Actual State
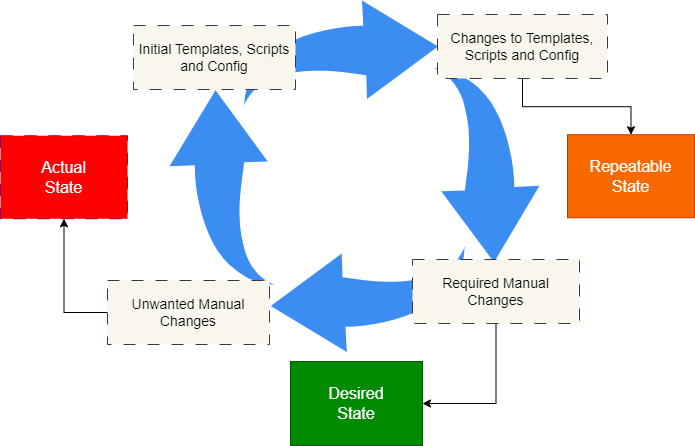
In the perfect world we can use tools such as Powershell, Arm Templates and Terraform to create exactly the environment we need, whenever we need to. In the perfect world all of our scripts and templates are always up to date and they contain everything we need. So the Repeatable State (from scripts and templates) is always the Desired State and it matches perfectly the Actual State.
In the real world however, even in the cloud, changes are made to resources such as networks and VMs. Configurations drift away from what was initially deployed. When these changes are included in Devops templates and scripts, then the Desired State is still the Repeatable State.
However, manual changes are often introduced as a result of emergency fixes and scripts don't always get updated. At that point, the Desired State is no longer the Repeatable State. In addition, other manual changes may be introduced as a result of unsuccessful attempts at fixes. At this point the Actual State of the environment is neither the Desired State nor the Repeatable State.
The diagram below summarises the cycle of changes to an environment (in the real world):
Use Cases for AzTfExport
AzTfExport can help in keep the Repeatable State, the Desired State and the Actual State in synch. In particular it can help in the following situations:
Integration and Performance Testing
Extra testing environments are often required in order to make sure that an application runs end to end and/or under production loads. Performance Testing environments in particular are not always in use and can be required at short notice for a particular purpose.
Terraform scripts are often used to create much of these environments, however, there are normally some manual tweaks. AztfExport can be used to generate state files from an existing test environment and then to create a new environment including all the manual changes that were made.
Demos
Preparing for a demo normally requires making changes to a default environment and with each demo there are alterations made before and during the demo. After a while, the demo environment can drift away from the latest configuration requirements. AzTfExport can help provide automation to create a stable a demo environment.
New Application Rollouts
Applications usually go through many rounds of testing in various environments. During testing, changes are made to each environment that may not be included in Devops scripts and templates. AzTfExport can help prepare an environment suitable for production by generating Terraform state files from testing environments which can then be configured for production loads.
Setup
- Install Terraform if you need to
- Install Go if you need to
- If you don't know what Terraform is or haven't used it follow this example which explains how to get started with Terraform and Azure
The most basic run through
The diagram below (hopefully) explains what we will do. Basically, we will create an environment, use AzTfExport to document the Desired State, make some changes to simulate errors (change the Actual State), and then use Terraform to get back to the Desired State.
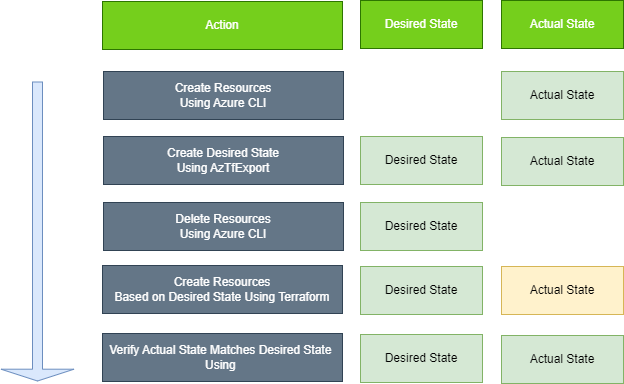
Create the environment
- Open Azure CLI
- Switch to the subscription that you want to create some test resources in
- Type "az group create --name myResourceGroup --location eastus" to create a Resource Group
- Type "az vm create --resource-group myResourceGroup --name myVM --image Debian --admin-username azureadmin --generate-ssh-keys --public-ip-sku Standard" to create a new VM in the Resource Group
Check the resources in Azure
Open the portal or run commands from Azure CLI to verify that the Resource Group and VM have been created.
Generate Desired State Using AzExport
So now we have actual resources and therefore an Actual State. However, we have no way of knowing whether someone has added something or accidentally deleted something. Cloud environments often contain thousands of individual resources. We need a way of defining our desired state should we ever have to recreate it.
Do the following to use AzTfExport to generate the Desired State (files):
- Open Visual Studio Code in a new folder
- Open New Terminal Window
- Run the following command: "aztfexport rg --non-interactive myResourceGroup"
Delete the Resources in the Resource Group using your preferred means, be it the Azure CLI or the Portal
To simulate making errant changes to the Desired State we will delete the VM and its associated Resources. Go into the Azure Portal and do the following, or do the same using Azure CLI:
- Open the subscription you used earlier
- Open the Resource Group called "myResourceGroup"
- Delete all the resources in the group
Get back to our Desired State using Terraform
We have now made some changes to the Actual State and it is not the same as the Desired State. However, since we used AzTfExport earlier to generate the Terraform files that define our Desired State, we can use Terraform to recreate it.
First we will run "Terraform Plan" which look at the state we defined (using AzTfExport) and compare that to the Actual State in order to determine what needs to be created. Then we will use Terraform Apply to create the Desired State.
- Open Visual Studio Code or a command window in the same directory as the AzTfExport was run in
- Run "terraform plan -out main.tfplan"
- Run terraform apply "main.tfplan"
Terraform will now create the VM and the associated resources in Azure.
Check Desired State matches Actual State using Terraform
Finally we we will run the Terraform commands again. This time however Terraform should tell us that there is no need to create anything:
- Open Visual Studio Code or a command window in the same directory as the AzTfExport was run in
- Run "terraform plan -out main.tfplan"
You will get the following message:

Summary
That's it. This was a simplistic example but it shows what a powerful tool AzTfExport is, and where it fits in the Azure and Devops armoury.