Storing sensitive data such as usernames and passwords in a yaml file is, as we all know, a very bad security practice. Using Azure Key Vault and downloading from that in a devops pipeline can remove this problem, and help develop a secure devops pipeline in Azure.
When I went to implement this in my devops pipelines however I noticed that most articles I read on the subject do not cover the setup process from start to finish, and there are a few gotchas in the process. Therefore I decided to write this article which hopefully explains how to set it all up from start to finish.
There are basically five steps in the process which are:
- Create A Service Principal
- Create A Key Vault and Key Vault Values
- Add Access Policy To Key Vault
- Add A Service Connection
- Use The Key Vault In The Yaml File
Create Service Principal
You need to create a Service Principal for this process and the easiest way to do this is in the Azure Portal in the Bash Shell. If you have more than one subscription however you need to make sure you have the correct subscription set. You can do that by doing the following:
- Go into the Azure Portal
- Open cloud shell. Select Bash when prompted to choose the command shell type.
- az account list --output table
- az account set --subscription "
"
Now to create a Service Principal. If you have been doing things in Azure for a while you will have lots of different Service Principals already but its best to setup a new one for this purpose.
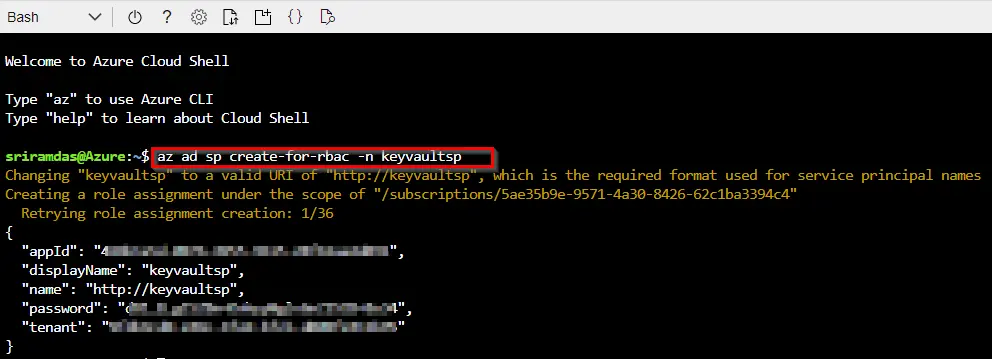
To create a Service Principal that is configured to work in pipelines do the following:
- Go into the Azure Portal
- Open cloud shell. Select Bash when prompted to choose the command shell type.
- Run the following command changing the last parameter to the name of the service account you require:
az ad sp create-for-rbac -n keyvaultsp
Create Key Vault And Key Vault Values
If you don't have a Key Vault already then you need to create one. You can create it from the portal or from the command line. Follow these instructions if you want to create one from the portal.
Add Access Policy to Key Vault
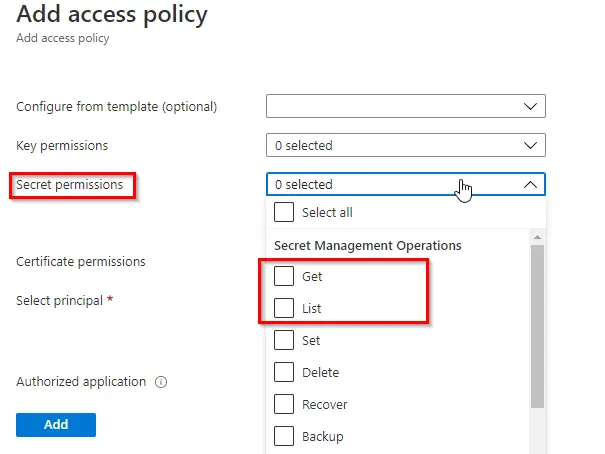
To add Access Policies to the Service Principal created earlier so that it has access to the Key Vault do the following:
- Go into the Azure Portal
- Select the Key Vault created earlier
- Select Access Policies from the left had menu
- Click on + Add Access Policy
- Select the "Select Principal" button and search for the Service Principal you created earlier by name or ID of the principal.
- Select the Service Principal when you have found it
- Click on the Secret Permission list
- Check Get and List permissions
- Click "Add"
Check You Have A Service Connection
You need to have a Service Connection in your project that has permissions to read from the Resource Group that your Key Vault is in. In the Azure Portal note the Subscription and the Resource Group your Key Vault is in.
In Azure Devops do the following:
- Click on Project Settings at the bottom of the left menu
- Click on Service connections
You can go through all the existing ones to see if there is a Service connection to the Subscription and Resource Group that your Key Vault is in and/or you can create a new one by doing the following:
- Click New service connection on the right menu
- Click on Azure Resource Manager and next
- Click Next again to select Service Principal (automatic)
- Select the Subsciption from the list
- Select the Resource Group from the list
- Give the subscription a name or accept the default and remember the name.
Use Key Vault Values In Yaml File
Access your Key Vault in your yaml file by using the AzureKeyVault task.
- Select the subscription
- Select the Key Vault
- Add a secrets filter or accept * which gives you access to all secrets in the vault
- Click Add
Now you will have the following in your yaml file:
- task: AzureKeyVault@1
   inputs:
     azureSubscription: 'xxxxxxxxxxxxxxx'
     KeyVaultName: 'xxxxxxxxxxxxx'
     SecretsFilter: '*'
     RunAsPreJob: false
Now you can use the Key Vault Values in the yaml file. The following is an example of a SqlAzureDeployment task which uses two secrets in a Key Vault called SqlUserName and SqlUserPassword
- task: SqlAzureDacpacDeployment@1
inputs:
azureSubscription: 'xxxxxxxxxxx (xxxxxxxxxxx-xxxx-xxxx-xxxx-xxxxxxxxxxx)'AuthenticationType: 'server'ServerName: 'xxxxxsqlserver.database.windows.net,1433'
DatabaseName: 'WebContent'SqlUsername: $(SqlUsername)SqlPassword: $(SqlPassword)DacpacFile: '$(System.DefaultWorkingDirectory)/bin/Debug/WebContentDbDeploy.dacpac'AdditionalArguments: '/p:BlockOnPossibleDataLoss=false /p:AllowDropBlockingAssemblies=true'PublishProfile: '$(System.DefaultWorkingDirectory)/bin/Debug/WebContentDbDeploy.publish.xml'