Introduction
Select lists or Drop-Downs are a key part of any end user application, particularly Angular Apps. Here is how to add a Select list to an existing Angular 9 App.
This article is part of a series which you can start here if you wish. Alternatively, you can download the git repo for the end of the last article so that you can start this one at the right place.
Add Angular Forms
In our Select Component we will be using NgModel. For this to work you need to add AngularForms to "app.module.ts".
If you do not do this, you will get the following error message (everyone gets it at least once):
Can't bind to 'ngModel' since it isn't a known property of 'select'
To prevent this from happening open "app.module.ts" and add the following line:
import { FormsModule } from '@angular/forms';Then you need to add the FormsModule to the imports array (toward the bottom of the file) so that it looks like:
...imports:[...,FormsModule,...],
Run the project
In your IDE or a command prompt type:
ng serveOpen a browser at localhost:4200 and from now on, everything we do will reflect on the screen instantly (or when the page is saved).
Currently the App looks like this:
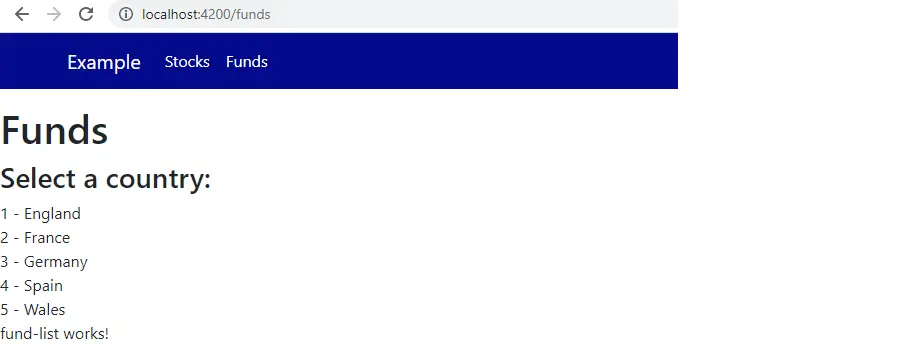
Currently we have a list of countries. However, we want a Select list which shows only the currently selected country, and once a country is selected it will call an event that can determine the data we see in other parts of the App. Let's go through slowly through how we make our ordinary list into a Select list.
Modify the html for the country-list component
In "country-list.component.html" replace the existing contents with the following:
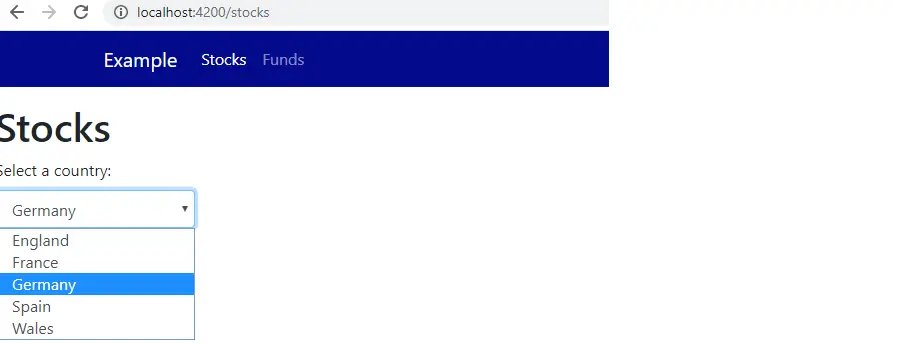
In the above HTML there is a repeated list of option tags (one for each country) inside a select tag. You can now see the beginnings of a Select component. It should look like the following:

The display is starting to look OK but nothing will happen when we make a selection. Also, the component has nothing to bind the current selection to, or vice-versa. To implement this we need to add some code to "country-list.component.ts".
Add a SelectedItem value and an event handler for the onChange event to country-list.component.ts
In "country-list.component.ts" make the following changes:
first add this line to create an object to bind the selected item value to:
SelectedCountryId:number;and then add a new method to call when the selected value changes. Add it below the "ngOnInit" method:
onChange(){//here is where we can call out to other services to use the value selected}
Add a model and call the onChange method from the Select html
Now that we have setup the Typescript side, we need to change the HTML to call our "onChange" and implement the binding. It should now look like the following (the changes are in bold):
The code above:
- calls the "onChange()" method whenever a selection changes;
- sets the "countryId" property to be the value passed when a selection is made;
- creates a binding between SelectedCountryId and the selected value
Check the ngModel binding working correctly after selection
Paste the following code temporarily below the select list HTML in "country-list.component.html":
Now select "Spain" in the list and you should see the following:

If it is working correctly remove the temporary HTML.
Now let's check the binding is working from model to HTML
In addition to the existing functionality, we want the ability to preset the selected item to be one of the values in the list (rather than how it currently is where no selection is made).
To check whether this would work should we want to do it, paste the following into the constructor of "country-list.component.ts":
this.SelectedCountryId = 3;
When the component re-loads, you should now see that Germany is now pre-selected. If it is working, comment out or delete the code in the constructor (we were just testing whether it would work or not).
Test the change method is being called
Test that the "onChange" method is being called by placing a break-point in Chrome or Edge Developer Tools and changing the selection:
Finally - add Bootstrap formatting
Now that we have the component working nicely, let's tidy the component up a bit. Paste the following into "country-list.component.html" to replace the existing HTML:
and the following into "country-list.component.scss":
.select-wrapper{max-width:200px;}
Our App should now look like the following when a country is being selected:
If I lost you along the way you can view the finished git repo here: